
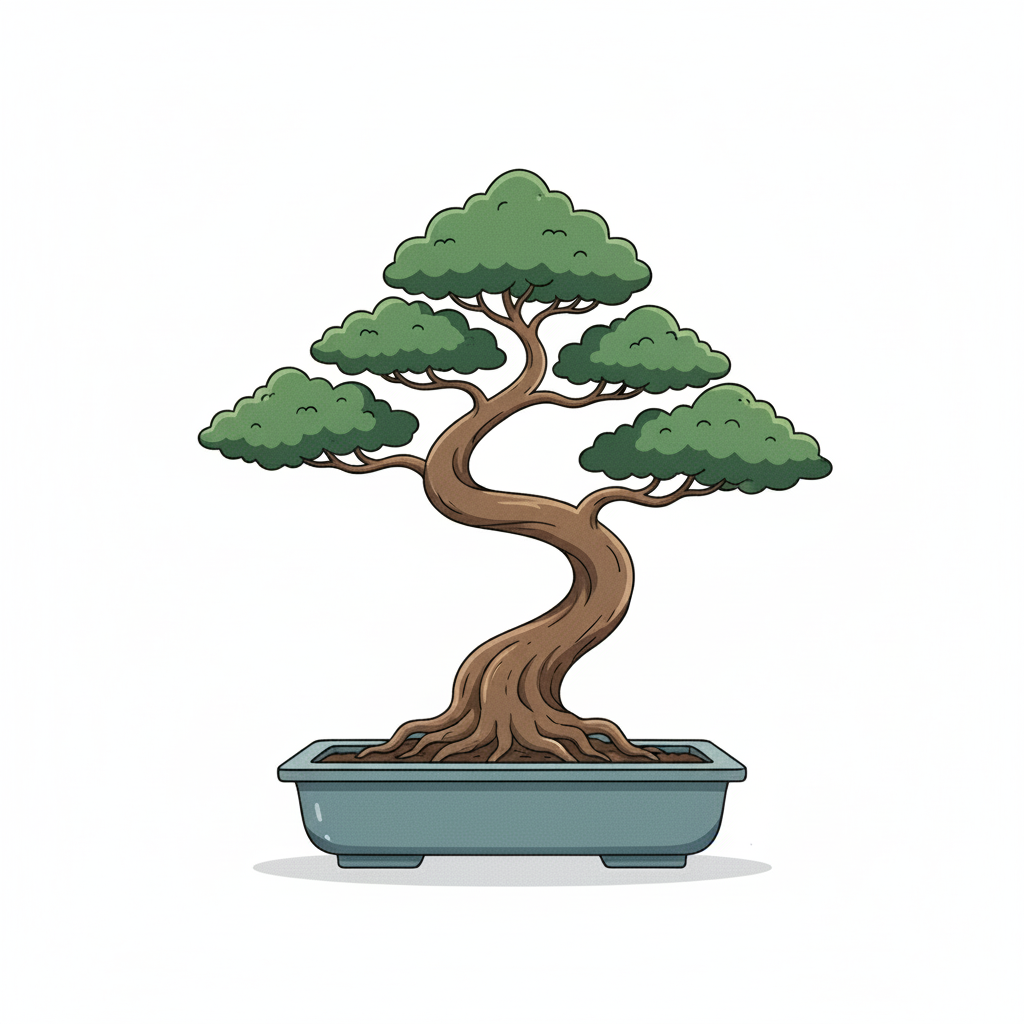
The Beginner's Guide to Your
Tinyroots Conifer DIY Bonsai Kit
A Complete Seasonal Guide to Growing and Caring for Your First Bonsai
Welcome to Your First Bonsai Adventure
Table of Contents
- Welcome to Your First Bonsai Adventure
- Introduction to Bonsai
- What's Inside Your Tinyroots Conifer Kit
- Safety & Preparation
- Choosing Your Tree
- Understanding Your Conifer
- The Seasons of Care
- Spring: Repot & Reset
- Summer: Grow & Maintain
- Fall: Clean Up, Refine & Prepare
- Winter: Rest, Protect & Prepare for Renewal
- Styling and Growth Over Time
- Common Questions & Troubleshooting
Welcome to Your First Bonsai Adventure
Congratulations, you've just taken the first step into the centuries-old art of bonsai. Inside your DIY Conifer Kit is more than a tree. It's the beginning of a living, growing relationship.
Your kit contains a young conifer pre-bonsai, carefully selected for its health and potential. It's been nurtured to this stage so that you can shape it into something beautiful. Think of it as a collaboration between nature and you. It's part gardening, part sculpture, and part mindfulness practice.
Working with bonsai is not hard, but it is different. You'll notice the soil looks coarse and rocky - that's intentional! You'll handle tools, wire, and soil in new ways. You'll learn how to repot, water, and style a living work of art.
Keep your conifer healthy and start forming its structure.
By following this guide, you'll learn how to:
- Identify when and how to repot safely
- Handle roots and soil correctly
- Wire and shape your tree without damaging it
- Understand the rhythm of the seasons
- Build confidence through hands-on experience
Above all, remember, bonsai is a journey of patience. Every tree, every person, and every moment is different.
Introduction to Bonsai
There are hundreds of bonsai books. This isn't another one. It's your on-ramp. We encourage you to read widely and learn from many voices, but you chose a Tinyroots DIY kit because you want to start small, build real skills, and gradually grow a pre-bonsai into something remarkable.
Bonsai is the practice of training living trees in containers while revealing their natural character over time. Progress is steady, not sudden. You will prepare soil, learn timing, make a few careful cuts, and then let the tree respond. Conifers—junipers, pines, cypresses, spruces, and others—are excellent first companions because they are hardy, expressive, and rewarding in every season.
What you'll get from this guide:
- A clear, seasonal path so you always know what to do next
- Safe, beginner-friendly techniques that protect tree health
- Plain-spoken explanations of tools, soil, and timing
- The confidence to take small steps now and save big moves for the right moment
Read a chapter, do a little work. Observation is part of the craft. The goal is not to finish a bonsai today; it's to begin a practice that leads to a healthy tree and a calmer, more attentive grower.
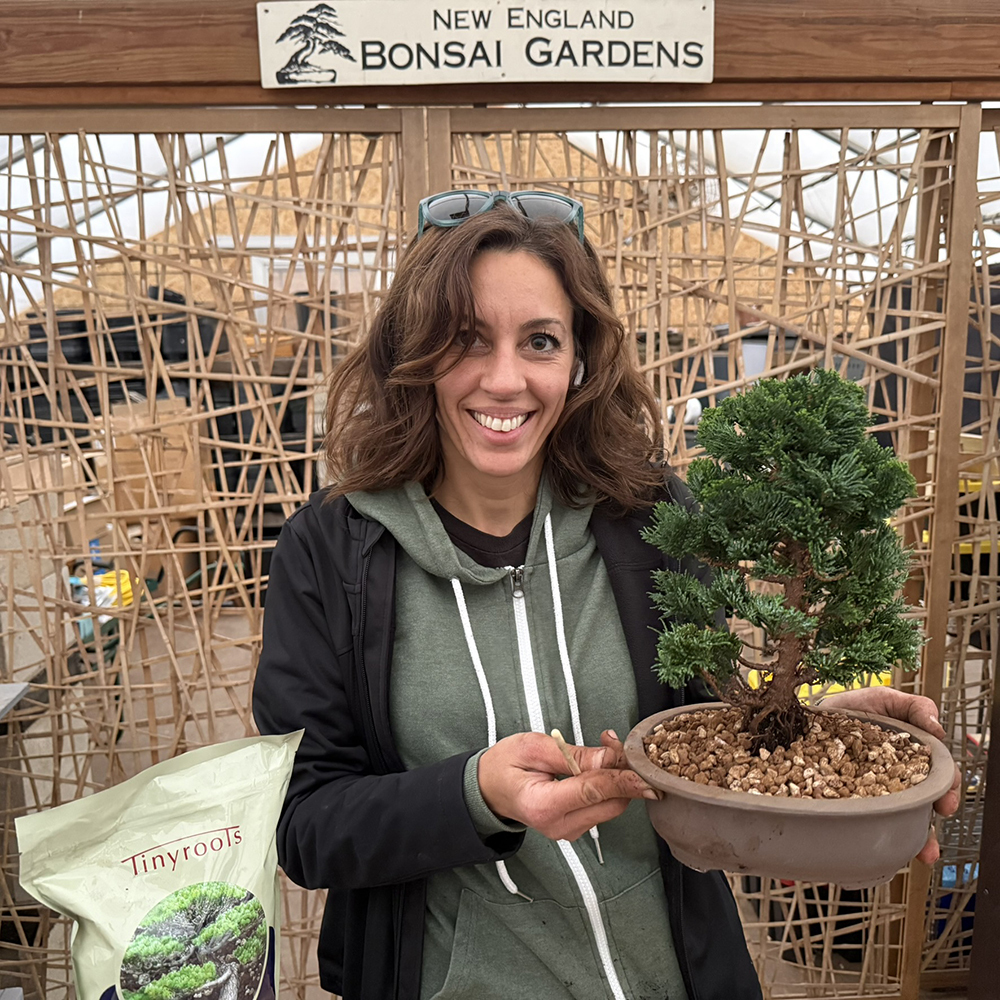
What's Inside Your Tinyroots Conifer Kit
The Tinyroots Conifer kit includes everything you need to get started, in a box: professional soil, a ceramic pot, real bonsai wire, and essential tools, chosen because they actually work.
Set up a clean, bright workspace. A table, bench, or large tray is perfect. Then unpack and identify each item:
Kit Components:
Conifer Pre-Bonsai Tree (sold separately): This is your living canvas. Whether your kit includes a tree or you plan to purchase one soon, identify the exact species first. The species determines proper care and the right timing for every task.
Ceramic Bonsai Pot: Proper depth and drainage holes keep roots healthy by preventing waterlogging and encouraging oxygen flow. The holes also let you water thoroughly and flush excess salts without leaving the soil soggy.
Tinyroots Premium Bonsai Soil (Akadama • Pumice • Lava): Pro-grade, fast-draining, and ready to use. It looks like gravel, that's good. No potting mix, peat, or additives needed. This is the same A-P-L blend professionals use for consistent, healthy root growth.
Drainage Mesh & Aluminum Wire: Pre-cut mesh keeps soil in and pests out. Anodized aluminum wire helps anchor the tree and allows gentle, bark-safe shaping.
Tinyroots Red-Handled Shears: Compact and sharp for precise cuts on roots and fine branches. These are real bonsai tools designed for clean cuts that heal quickly.
Chopstick: Simple and essential for loosening soil, settling mix between roots, and removing air pockets during repotting.
Fertilizer Basket + Sample Fertilizer: Place pellets in the basket for clean, targeted, slow-release feeding at the root zone. Reduces runoff and critters and keeps the surface tidy.
Printed + Downloadable Instructional Book: A quick printed guide for setup and care, plus a detailed digital version you can reference anytime. Step-by-step instructions walk you through each stage with confidence.
Keep a small bowl of water or a spray bottle nearby. Once exposed, roots dry quickly; keep them lightly damp while you work.
Safety & Preparation
Working with live trees is hands-on and rewarding. It also involves sharp tools, metal wire, and physical force. Read this section before you begin and keep it nearby while you work.
This guide is instructional. It does not replace professional training or local guidance. By using this guide and kit, you agree to work carefully and at your own risk, and to seek qualified help when unsure. Keep all tools and materials away from children and pets.
Tool Safety
- Cut away from your body and hands
- Hold wire firmly at both ends when cutting to prevent snap-back
- Wear eye protection for wire work and bending
- Keep blades clean and sharp; store tools closed and out of reach of children and pets
- Gloves are optional but helpful for wiring or rough bark
Workspace Setup
Work on a stable, well-lit surface. Keep the area dry and clear of cords or clutter. Secure the pot before bending branches, and have a small first-aid kit nearby.
Handling Materials
Wash hands after handling fertilizer or sap. Never ingest any soil or amendments. Use good ventilation and dispose of wire off-cuts safely.
This publication is for educational purposes. Techniques may vary by species, climate, and individual tree. Neither the publisher nor Tinyroots is responsible for injury, property damage, or plant loss resulting from the use or misuse of this guide, tools, or materials. Always follow local regulations and manufacturer instructions for all products used.
Choosing Your Tree
Your Tinyroots Conifer Kit includes everything except the tree, by design. You can use it with a conifer pre-bonsai purchased from a bonsai nursery, a local club, or even select your own from a traditional garden center. Each path has its advantages, but the goal is the same: to start with healthy, character-rich material that will reward your care and patience.
Where to Find a Tree
- Bonsai Nursery: The easiest option. You'll get true pre-bonsai. Trees already grown with trunk movement, branching, and root health suited for bonsai.
- Local Club or Hobbyist: Affordable and educational. Many enthusiasts sell or trade material while offering tips and guidance.
- Garden Center: Possible, but requires a discerning eye. You'll find plenty of conifers, but many are landscape forms or grafted stock.
What to Look For
When selecting your tree, especially from non-bonsai sources, look for the same traits professionals seek:
- Trunk Character: Subtle movement or taper adds instant personality
- Low Branching: Branches closer to the base offer better design options
- Healthy Foliage: Even color, no dieback, and firm, flexible needles
- Compact Growth: Finer foliage responds better to pruning and styling
Avoid rootbound plants in small nursery pots or trees with dull, brittle foliage. These often struggle after repotting.
A Note on Grafted Trees
Many garden-center conifers are grafted. A technique where a desirable top (scion) is joined to a hardy rootstock. While grafts can perform well, the graft union (often a visible swelling or change in bark texture) can be challenging to disguise in bonsai. Beginners usually prefer non-grafted or low-grafted trees with clean, natural trunk lines.
Recommended Beginner Conifers
- Juniper (Juniperus): Resilient and forgiving; excellent for learning structure and pad work
- Hinoki Cypress (Chamaecyparis obtusa): Graceful, fan-shaped foliage and elegant bark
- Spruce (Picea): Cold-hardy with compact growth—ideal for northern climates
- Japanese Black Pine (Pinus thunbergii): Dynamic growth and striking bark, thrives with strong sunlight and airflow
Climate Matters
Match your species to your growing zone:
- Cold regions: Spruce, juniper, or pine varieties adapted to winter dormancy
- Warm regions: Heat-tolerant cypress or juniper types that prefer strong light and moderate watering
If in doubt, ask a local bonsai club or nursery which conifers thrive in your area.
Understanding Your Conifer
Know your species. Each conifer has unique growth rhythms, needle structure, and seasonal timing. Identify your tree by its tag or purchase record, then match care to the species. Throughout the book, when in all doubt, defer heavy work to spring and keep summer focused on health.
Conifers are evergreen, outdoor trees that stay green year-round. Common examples include Juniper, Pine, Spruce, and Cypress. They grow slowly, live for decades, and naturally develop rugged bark and fine branching. Traits that make them ideal for bonsai.
Expected Outcomes
Your first goal isn't to "finish" a bonsai in one day. It's to keep the tree stable, healthy, and growing. Today is about good setup and gentle handling.
Within your first year, you'll learn to:
- Repot safely at the right time (spring) and secure the tree so new roots can form
- Shape basic structure with light wiring and selective trimming. No rush
- Maintain health through consistent watering, proper sunlight, and steady feeding
- Read the seasons and adjust care as growth speeds up, slows down, or goes dormant
With patience and routine care, this pre-bonsai can mature into a tree that lasts for generations.
The Seasons of Care
Conifers live by the rhythm of the seasons. They're outdoor trees that need sun, fresh air, and a cool dormant period each winter to stay healthy. The timing and intensity of care can vary depending on where you live, but the seasonal rhythm is the same everywhere.
Spring – Repotting & Renewal
This is your tree's most active period. As buds swell and roots awaken, it's time to repot, refresh the soil, and lightly prune if needed. In most northern states, that's late March through mid-April; in warmer regions, it can happen earlier. Always repot before new buds fully open.
Summer – Growth & Maintenance
Your tree will grow vigorously with longer days and warmer weather. Water deeply and regularly, feed on schedule, and check wire often to prevent marks. Conifers love full sun, but if you're in a hot southern climate, protect them from intense afternoon heat with partial shade.
Fall – Preparation & Transition
As temperatures cool, growth slows and the tree begins to prepare for winter. Light pruning, needle thinning, and cleanup help improve airflow and structure. Stop fertilizing about a month before your first frost to allow new growth to harden off.
Winter – Dormancy & Protection
Cold weather is vital for conifers. It's when they rest. In northern areas, protect trees from freezing winds by placing them in a cold frame or sheltered outdoor area. In milder climates, you may need to simulate dormancy by reducing watering and keeping the tree in the coolest available outdoor spot.
For most conifers, the ideal repotting time is early spring, just as buds begin to swell. When roots are waking up but before new growth begins.
Conifers thrive in regions with cool winters and defined seasons. If you live in a southern or tropical climate, certain species like Junipers may adapt with care, but they generally need cooler winter rest to stay healthy long-term.
Start Here: Care and Work Depends on Season
Choose the timing that matches when you received your conifer, or use the season-by-season notes below for guidance.
Now, Let's Begin the Art of Bonsai
You've learned what's inside your kit and how the seasons shape your tree's life. Now it's time to get hands-on. Bonsai isn't about speed, it's about awareness, patience, and small, confident steps. Take your time, enjoy the process, and remember: every cut, wire, and touch shapes both the tree and your understanding of the art.
Choose Your Season (Start Here)
We know you're excited. Opening a Tinyroots Conifer DIY Kit feels like you're about to create a finished bonsai today. But bonsai is a seasonal craft, and trees stay healthiest when you match your actions to the time of year. That's why we ask you to pick your season first and follow those steps.
If it isn't the right time to repot, that's not a setback. It's smart bonsai. Use this period to learn your tree's species, choose a front, practice basic wiring on a single branch, and dial in watering, light, and placement. Then, when your season's window opens (usually early spring for repotting), you'll make one confident move that sets the tree up for years of success.
Think of today as setting the stage, not finishing the show. With success, you'll cycle through these seasons again and again, each pass a chance to do the right task at the right time. Small, well-timed steps beat big, rushed ones, every time.
Spring: Repot & Reset
Spring is when your bonsai wakes up. Sap begins to move, roots start growing again, and buds swell with energy. This is the only safe season to repot conifers, to refresh the soil, examine the roots, and give your tree a healthy start for the year ahead.
Check Your Timing
Look closely at your tree:
- Buds swelling but not yet open? ✔️ Perfect time to repot
- Buds already pushing new growth? ❌ Wait, treat it like summer care and repot next spring
If your tree just arrived by mail, let it rest 2 weeks in bright shade before any major work. It needs to acclimate first.
What You'll Need
Take a breath. Bonsai isn't about finishing the tree in a day. This is simply about giving it a solid foundation. Gather everything first:
- Your ceramic pot, mesh, and tie-down wires
- Tinyroots soil (APL - Akadama, Pumice, Lava) - the same mix professionals use
- Tinyroots tools: red-handled shears, chopstick, and aluminum wire
- A clean, bright workspace
Preparing the Pot
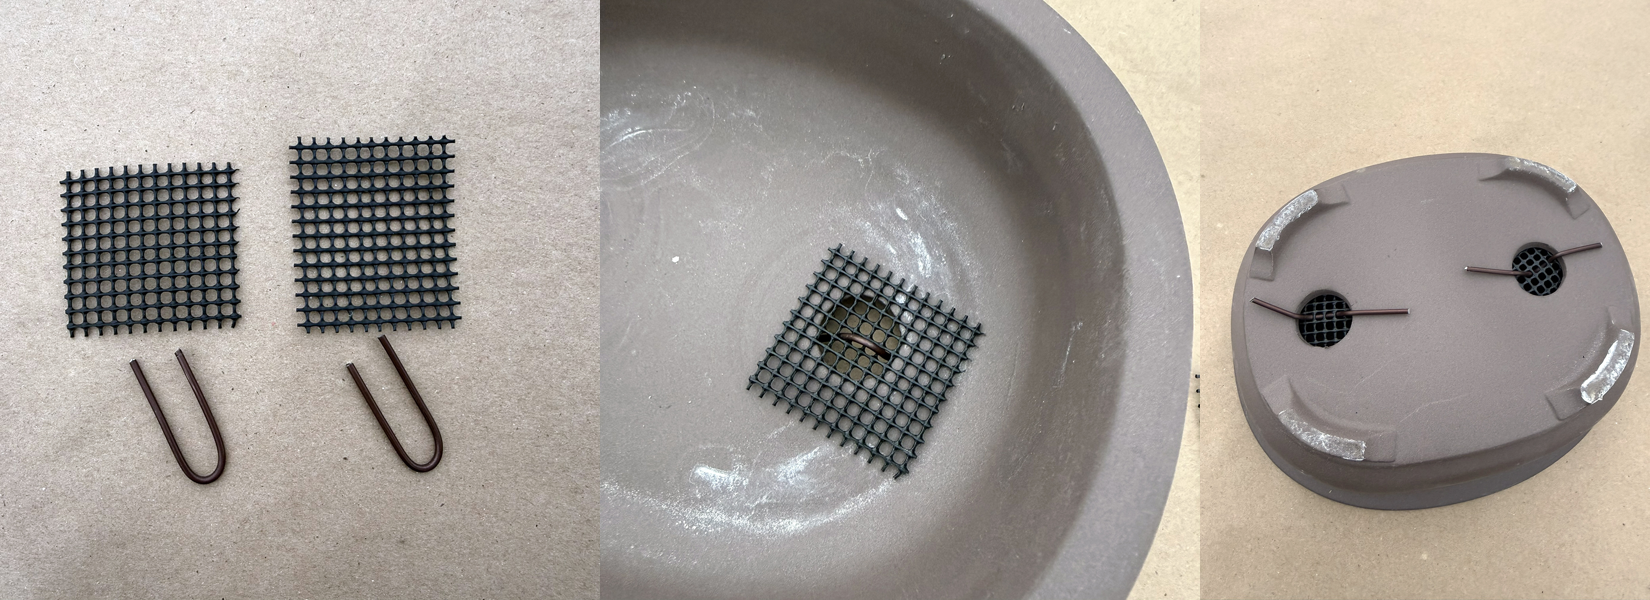
1Add the Mesh
- Cut the mesh to fit over each drainage hole. It may already be pre-cut
- Cut and Bend two 2-inch pieces of 2.0 mm wire into U-shapes
- Push each U-wire through the mesh and hole, twisting underneath to lock it in place
2Install Anchor Wires
- Cut from the remaining wire approximately two 12-inch pieces of wire. (You should be left with enough wire to shape a branch or two in the future)
- Thread both pieces through the holes so the ends meet in the middle, then push and fold them to the outer sides of the pot. These will secure the trees root ball after planting
At this stage: your pot is ready. Mesh secured, anchor wires centered, and waiting for your tree.
Understanding the Soil
Your soil may surprise you. It looks more like gravel than dirt, and that's intentional. Bonsai roots need both air and water, not the heavy moisture of potting mix. Don't add peat or compost.
Repotting Your Tree
If this is your first time, move slowly. The goal is confidence, not speed.
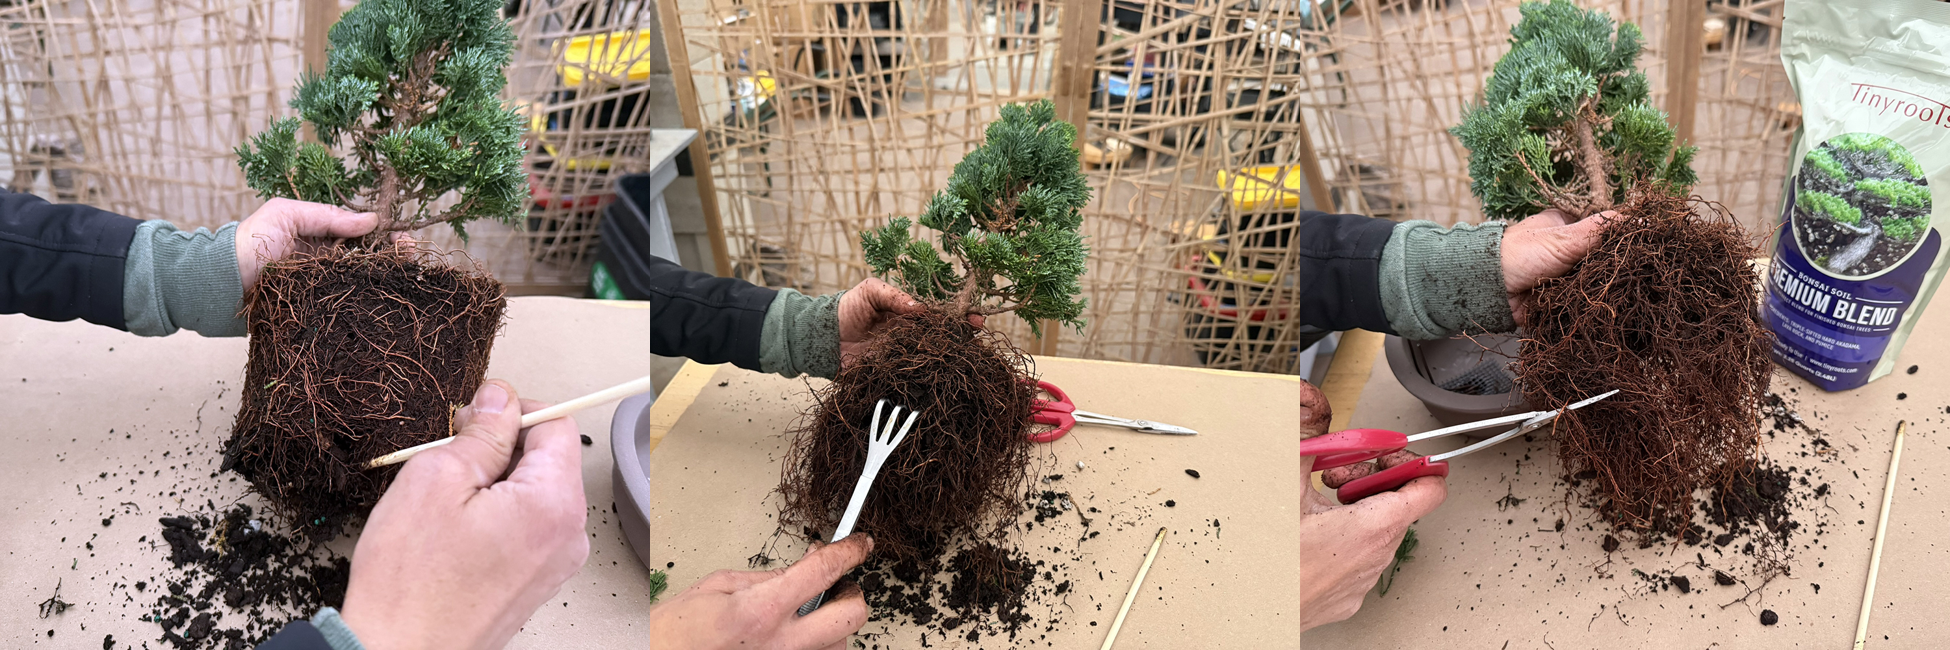
1Remove the Tree
Gently slide your pre-bonsai out of its nursery pot. Tap the sides to loosen it, or trace around the edge with your chopstick. Always support the trunk, Never pull too hard.
2Loosen the Roots
Use your chopstick to tease out the outer roots, working from edges toward the center. Remove about one-third of the old soil, keeping roots damp. You don't want to remove all of the soil. However, you need to remove enough soil for it to fit nicely in the ceramic pot.
3Trim the Roots
With your Tinyroots shears, trim long or circling roots, but keep the fine feeder roots. They're the lifeline. Avoid removing more than 60% of the total root mass.
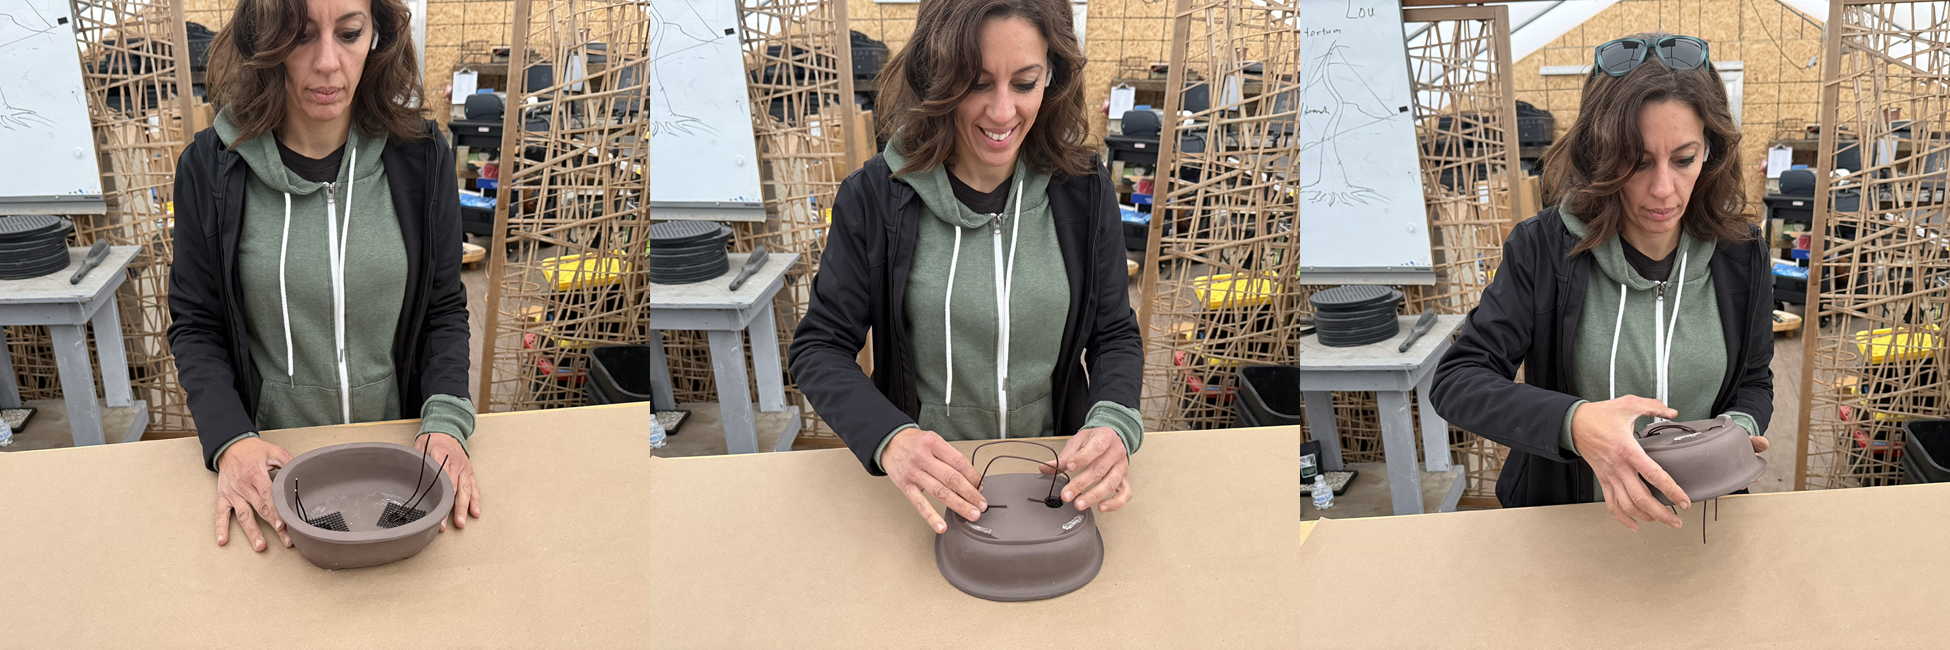
4Position & Secure
Add a shallow layer of soil to the pot. Position your tree slightly off-center (it looks more natural). Spread the roots evenly and cross the anchor wires over the root ball, twisting snugly. Firm but not crushing. You may need to use pliers to twist the wire together. Then cut the extra length.
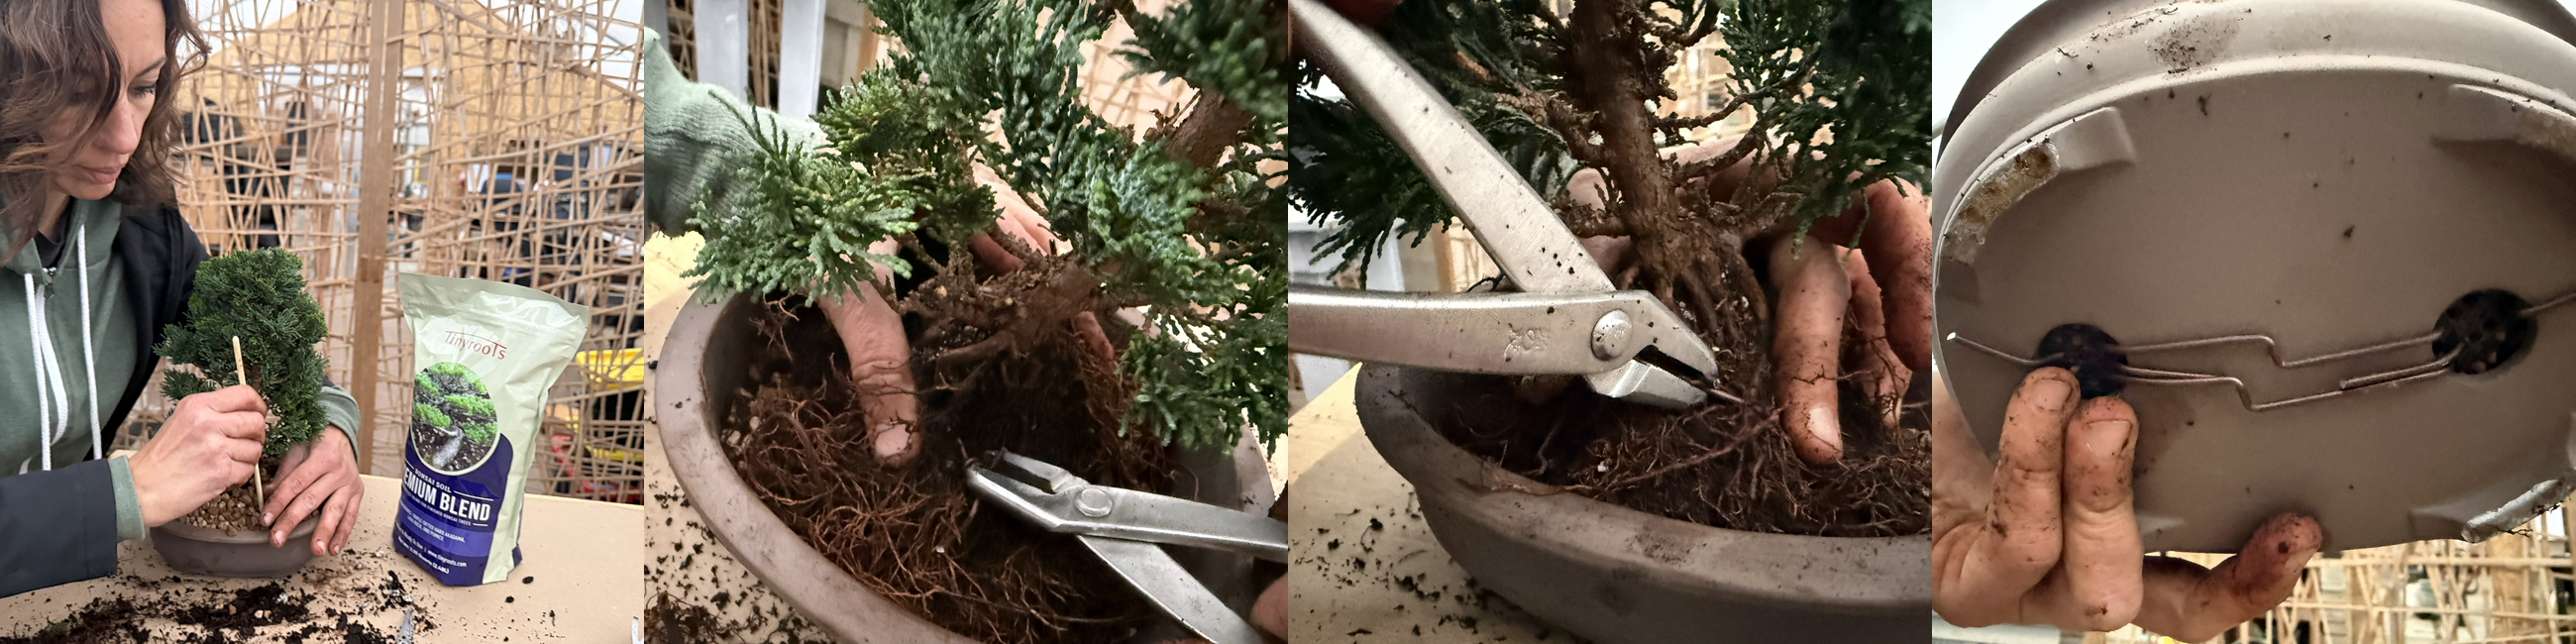
5Add Soil & Remove Air Pockets
Fill the pot with soil until all roots are covered. Use your chopstick to poke gently around the root zone, allowing the soil to settle between roots.

6Water Thoroughly
Water slowly until it runs clear from the bottom of the pot. This ensures the roots are hydrated and no air pockets remain.
If you're not familiar with watering bonsai, please read up on the subject. Watering is extremely important to the success of your bonsai.
Aftercare (Next 2–3 Weeks)
- Place your tree in bright shade, protected from harsh wind and full midday sun
- Keep the soil evenly moist, not soaked
- Do not fertilize until you see new growth emerging
- Do not style the tree yet. Give it time to recover and root
Why Spring Work Matters
Repotting before buds open allows roots to rebuild feeder tips quickly in fresh soil. Wait too long and new growth can wilt from shock. Done right, you've just given your tree a fresh start. Strong roots, proper soil, and a stable foundation for styling later in the year.
? How This Fits Into the Year
Once your tree stabilizes, the rest of the seasons become maintenance and observation.
- Summer focuses on watering, feeding, and gentle shaping
- Fall is cleanup and prep for dormancy
- Winter is rest and protection
Spring is your action chapter. Everything that follows is how you nurture what you've just set in motion.
Summer: Grow & Maintain
Summer is the season of momentum. Your bonsai is wide awake. Roots active, needles extending, and every ray of sunlight fueling growth. This is when the tree does the heavy lifting. Your role now shifts from creator to caretaker. Balance heat, hydration, and light; avoid overworking the tree. Think of summer as your bonsai's "training camp". You're building health, not design.
What's Happening
Roots are expanding rapidly, photosynthesis is at full power, and soil dries faster than ever. Long daylight hours are great for strength, but they also magnify stress if watering, airflow, or wire checks are inconsistent.
Most summer mistakes come from doing too much. This season rewards consistency over creativity. Learn your tree's rhythm. How fast it drinks, how the needles react to heat, and how light shifts across your yard through the day.
Daily Care — The Foundation
Watering Mastery
Watering is your #1 summer task, and your biggest teacher.
- Check daily. Press your finger ½" into the soil; if it's dry, water deeply until it runs clear from the drainage holes
- Hot days (85–90°F+): You might need to water twice, once early, once late afternoon
- How to water: Pour slowly in passes; let the soil absorb between pours to avoid dry pockets. Water thoroughly until water is coming out of the drainage holes
- Avoid: "A quick splash." It only wets the surface, leaving roots thirsty
Use the chopstick and stick it in the soil. Leave it there for a couple minutes. Check it like a dipstick. Dark means moist, light means dry. You'll quickly learn your tree's true rhythm.
Feeding for Strength
Fertilizing keeps your bonsai fueled, but moderation is key.
- If you repotted in spring, wait until you see strong new growth before feeding
- If you did not repot, feed on schedule: use the provided fertilizer pellets with the fertilizer baskets to keep things tidy and prevent runoff. If you just repotted in the spring, wait a few weeks before starting to fertilize
- Skip feeding during extreme heat waves. Trees conserve energy when it's too hot
Think of feeding as a steady diet, not a feast. Over-fertilized trees can stress or burn.
Maintenance Work — The Safe Stuff
Wire Patrol & Gentle Shaping
- Inspect every 1–2 weeks. Summer growth thickens branches quickly. Remove or adjust wire as soon as faint marks appear
- Who can you wire? Only vigorous trees not newly repotted this year
- How much to wire? Small, natural adjustments. One or two branches. Nothing major
- Practice project: Try wiring a clipped twig to learn correct 45° angles and gentle bends before applying to your tree
Never wire in extreme heat or right after watering. Branches are more brittle and prone to cracking.
Heat & Light Management
Conifers love light, but even they need protection from extreme heat.
- Provide 2–3 hours of light afternoon shade in heat waves
- Space trees for good airflow; stagnant air invites fungus
- Use 30–40% shade cloth if temperatures soar
- Morning sun + afternoon shade = ideal balance for health and color
Midday droop that recovers at night? Normal heat stress. Don't drown the tree, improve airflow and shade.
Canopy Care & Cleanliness
Keep foliage clean and healthy:
- Mist or rinse foliage early in the morning to remove dust and boost photosynthesis
- Remove dead interior needles and trapped debris to improve airflow
- Lightly trim long tips on junipers with scissors (never pinch). Avoid cutting into brown interior growth
- Pines: Skip candle work unless you're trained, it's a precise timing-based technique (Japanese Black Pine "decandling" happens only under expert guidance)
Soil Surface TLC
Summer's heat can harden soil surfaces.
- Loosen the top ¼" with your chopstick to restore airflow and water absorption
- Top-dress lightly with A-P-L soil around edges if settled
- Avoid thick moss, it can trap moisture and overheat the root collar
Learning & Light Activity
Study Your Tree's Structure
Summer is perfect for observation.
- Rotate your bonsai weekly to study its shape from all sides
- Take photos from 4 angles and mark your preferred "front"
- Sketch or make notes for future styling (next spring)
- Watch how branches respond to light. This helps guide future pruning choices
This quiet study time builds your eye and patience — the true art of bonsai.
Health & Pest Monitoring
Summer is also pest season.
- Check under needles for spider mites, scale, or aphids, Early detection prevents outbreaks
- Look for fungal spots. Improve airflow, remove affected foliage, and water early so foliage dries by nightfall
- If you notice white crust on the pot or soil surface, do a thorough flush on a cool morning to remove mineral buildup
What NOT to Do
- ❌ No repotting (too hot; roots can cook)
- ❌ No heavy pruning, wiring, or carving
- ❌ No multiple big operations at once
- ❌ No moving your tree indoors (conifers are outdoor species)
Quick Species Notes
(Always Check Your Species Care Guide)
- Junipers: Light scissor-tip trimming only; never pinch. Keep some green at branch tips
- Japanese Black Pines: Advanced decandling in early summer only. Skip in year one
- Spruce, Fir, Hemlock: Prefer cooler conditions; afternoon shade is vital
- Cypress, Cedar: Watch watering closely. They dislike prolonged dryness
Weekly Summer Checklist
- ☐Check soil moisture daily; water deeply as needed
- ☐Feed on schedule (skip during heat waves or recent repot)
- ☐Inspect wire and adjust before marks form
- ☐Rinse foliage and check airflow
- ☐Inspect for pests and fungus
- ☐Take photos or notes for your fall plan
Summer Reflection
Summer teaches consistency. Your job is to maintain balance, not push the tree. You're learning how your bonsai behaves under stress, what it needs most, and how it communicates through subtle cues. Every careful watering, every small observation adds up. Healthy trees in summer mean endless creative possibilities next spring.
Fall: Clean Up, Refine & Prepare
Fall is reflection and reset. Growth slows, nights cool, and your conifer shifts energy back to its roots. This is the season to tidy, learn your tree's structure, and make light refinements, not big design moves. Think of fall as thoughtful housekeeping that sets up an easy winter and a strong spring.
Inner needles turning yellow/brown in fall is normal. Your tree is shedding old foliage. Remove gently; don't panic.
What's Happening (and why it matters)
- Sap flow slows; wounds heal slower. Heavy cuts or big bends are riskier now
- Water use tapers. Soil dries more slowly. Overwatering can creep in
- Structure reveals itself. With thinner foliage, you can see design opportunities clearly
Cleanup & Health — The Foundation
Canopy Cleanliness
- Remove old interior needles and trapped debris to improve airflow
- Snip dead twigs and obviously weak, shaded sprouts
- Avoid wholesale thinning, keep plenty of green on tips for winter strength
Surface & Pot Care
- De-crust the top ¼" of soil with a chopstick so water penetrates evenly
- Rinse foliage in the morning to clear dust (optional in cool weather)
- Wipe salt deposits from the pot rim; if needed, do a cool-morning flush
Watering in Fall
- Water less frequently than summer, but never let the root ball go bone-dry
- Cool nights = slower drying. Check before you water; aim for evenly moist, not wet
Light, Feeding & Pest Watch
Light & Placement
- Maximize full sun; lower-angle light hardens tissues for winter
- Keep good airflow so dew/rain dries quickly
Fertilizing
- Taper and stop feeding ~4 weeks before first frost so new growth hardens
- If frost dates are unknown, stop when nights sit in the low 40s°F
Pests & Fungus
- Inspect weekly (undersides of foliage)
- Remove affected bits; improve airflow; water early so foliage dries by nightfall
Structure Study — Plan, Learn, Have Fun
- Choose your front. Rotate the tree; mark the best viewing angle with a bit of tape
- Photo log: Front, back, both sides, + top-down for branch layers
- Sketch ideas: Note which branches are keepers for spring styling
- Micro-projects for the do-ers: Clean loose, flaky bark (not live bark), refresh labels (species/repot date), sharpen/oil tools
Turn this into a 10-minute weekly ritual. Photos, notes, and a quick tidy. You'll see your progress month to month.
Fall Styling: Proceed with Care
(Refinement, Not Transformation)
You can style in fall—lightly—if conditions are right.
When it's appropriate
- Tree is vigorous (not recently repotted, not weak)
- You have 3–4+ weeks of mild weather before hard freezes
- Cool, stable days ~50–70°F; you're working outdoors
- You'll do light to moderate refinement only
What's safe to do
- Wire refinement: Align angles, organize pads, refine the silhouette
- Remove small cluttering twigs; thin weak, shaded interior growth for airflow
- Light deadwood (jin/shari) only on dry days and well before hard frost; seal/whiten as needed
- Evaluate design with fresh photo. Fall light reveals framework beautifully
What to avoid
- Major structural wiring or heavy bends (bark/cambium are less flexible)
- Large cuts on weak/recently repotted trees
- Heavy pruning right before cold (slow healing invites dieback)
How to style safely
- Wire only dry branches (not right after watering)
- Use proper gauge; avoid overly tight wraps
- Bend slowly; stop if you feel resistance or hear fiber crackle
- Stop at "enough." Fall is for order, not heroics
After-styling care
- Bright, sheltered light for 1–2 weeks; normal watering; no heavy feeding now
- Shield from frost/wind immediately after work
- Move to your winter shelter once nights hover near freezing
Species Notes
(always check your Species Care Guide)
- Junipers: Fall wiring often works well; avoid over-thinning. Keep green on tips
- Japanese Black Pine: Light wiring/pad positioning only; heavy bends wait for mid-winter dormancy or early spring
- Spruce/Fir/Hemlock: Bark turns brittle early. Save most styling for spring
- Cypress/Cedar: Moderate work only; avoid heavy wire tension (scars easily in cold)
Winter: Rest, Protect & Prepare for Renewal
Winter is quiet, and that's exactly what your bonsai needs. Growth pauses above ground while roots rest below. Your role shifts from "hands-on gardener" to "watchful caretaker." Winter is about protection, observation, and preparation. Keeping your conifer safe through the cold so it wakes strong in spring.
Dormancy isn't death. Your bonsai may look asleep, but beneath the surface, it's storing energy for next year's growth.
What's Happening (and Why It Matters)
- Sap flow slows to nearly zero. The tree conserves energy. No pruning or fertilizing
- Roots are alive, not active. They still need moisture, just not much
- Temperature swings are dangerous. Freeze–thaw cycles can damage roots and bark
Preparing for Dormancy - Shelter & Setup
Outdoor First (Always!)
Conifers need true cold dormancy, but not exposure. Move them to a protected spot once nighttime lows reach the mid-30s°F.
Choose the Right Spot
- ✅ Cold but not windy — an unheated porch, shed, garage, or cold frame is ideal
- ✅ Bright indirect light is fine — no need for full sun
- ✅ Avoid basements or warm indoor spaces — they break dormancy too early
Set the Stage
- Elevate pots on boards or bricks to prevent frozen drainage
- Surround pots with mulch, straw, or pine needles for insulation (never cover the trunk)
- Cluster trees together to stabilize humidity and temperature
- Shield from wind — cold wind dries needles and bark faster than cold itself
You're building a chilled but safe "winter cabin" for your bonsai.
Watering in Winter
- Less is more. Check every 7–10 days. Water only when the top layer feels dry
- Frozen soil? Skip watering until it thaws
- Goal: Keep soil slightly moist — never soggy, never bone-dry
- Tip: Tilt the pot a few degrees to help meltwater drain after ice or snow
No-Fertilizer Zone
Skip feeding entirely. Roots aren't actively absorbing nutrients, and fertilizer can burn them. Resume feeding when buds swell in spring.
Light Touch Maintenance
Inspect & Observe
- Check every few weeks for pests (especially spider mites in warmer shelters)
- Look for rodent damage if trees are outdoors — mesh barriers deter nibbling
- Brush off snow gently; let frost stay. It insulates naturally
Tool & Workshop Projects (for You!)
- Clean, oil, and sharpen tools
- Reorganize your bonsai space
- Sketch or print your spring repot plan
- Study your fall photos — visualize future structure
Practice wiring on pruned twigs — perfect muscle memory training without risk to your tree!
Late-Winter: The Transition Window
As daylight increases and temperatures creep upward, your bonsai begins to stir. This is your moment to start preparing, and for some species, a time for gentle, early action.
Signs Dormancy Is Ending:
- Buds begin to swell (plump, not open)
- Color brightens slightly on branch tips
- Soil starts drying faster between waterings
What You Can Do Now:
- Move into more light gradually — avoid shocking roots with sudden warmth
- Resume watering consistency as activity picks up
- Begin light styling only on hardy conifers (Junipers, Pines) if you're experienced
- Sap flow is still low, so branches bend more predictably
- Avoid large cuts or full wiring sessions; focus on refinement and structure checks
For your first winter, keep things simple. Observe, learn, and wait. You'll get better results wiring once consistent spring warmth returns.
When to Worry (and When Not To)
- ⚠️ Rapid freeze–thaw swings: Add insulation or move trees deeper into shelter
- ⚠️ Excess dryness: Brown tips or needle drop mean it's too dry — water lightly once thawed
- ✅ Slight dulling of color: Normal. The tree is resting
Quick Checks
- ☐Lows well below freezing? Add windbreaks and mulch around pots
- ☐Soil dust-dry? Water lightly — even in dormancy
- ☐Early bud swell? Prepare for repotting (spring window approaching)
Winter Do's & Don'ts
Do
- Keep outdoors in an unheated area (cold frame, porch, protected bench)
- Water sparingly and evenly
- Inspect monthly for pests or windburn
- Tidy pots and label species with last repot date
Don't
- Fertilize, repot, or do heavy wiring
- Expose to drying winds or direct freeze–thaw cycles
- Let roots freeze solid for long periods
- Bring conifers indoors
Simple Winter Checklist
- ☐Move trees to shelter before hard frost
- ☐Elevate pots and mulch around (not over)
- ☐Water lightly every 7–10 days
- ☐Inspect for pests and rodents monthly
- ☐Brush off snow gently
- ☐Clean tools and plan for spring
- ☐Watch buds for early swelling
Winter Reflection
Winter is your bonsai's deep breath — a pause before renewal. The stillness is part of the art. Take time to rest, plan, and connect with your tree's rhythm. When spring returns, both you and your bonsai will be ready to grow again.
Bonsai isn't about constant doing — it's about timing. Winter teaches patience, and patience creates better bonsai.
Styling and Growth Over Time
If you've made it this far, take a moment to look at what you've accomplished. You didn't just follow steps, you learned the rhythm of a living art form. You've touched real soil, studied the balance of roots and branches, and taken part in a tradition that's been refined for centuries.
Each season you experience - from spring's repotting energy to winter's quiet stillness - will teach you something new. Some years you'll celebrate strong growth; others, you'll learn patience when progress feels slow. That's the essence of bonsai: time becomes your teacher.
Remember, your Tinyroots Conifer Bonsai Kit wasn't designed to make a finished bonsai in a weekend. It was designed to start a journey, one that rewards consistency, observation, and care. The tree in front of you will change shape, gain strength, and eventually tell your story through every curve and scar.
Your goals:
- Keep your tree healthy
- Keep yourself curious
- Enjoy the small rituals that connect the two
Bonsai is more than a hobby. It's a practice of balance, patience, and respect for nature. Every time you water, trim, or simply observe your tree, you're nurturing something far bigger than a plant. You're cultivating awareness.
So take a deep breath, step back, and enjoy what you've created. The art of bonsai isn't about perfection, it's about connection. With time, your hands will learn the same quiet confidence that your tree already knows.
Thank you for choosing Tinyroots. We're honored to be part of your journey, and we can't wait to see what you grow next.
Stay Connected — Keep Growing with Tinyroots
Your bonsai journey doesn't end when the soil settles. It begins there. Every season will bring new questions, small victories, and a deeper connection to nature. You don't have to do it alone. Bonsai is a community as much as an art form.
Join a Local Bonsai Club
Meet other enthusiasts who share your curiosity and passion. Clubs often host workshops, guest artists, exhibitions, and friendly "bring-your-tree" sessions where you can learn faster than any book or video ever could.
Search online for a local club, or ask your nearest nursery for recommendations. Most are excited to welcome beginners.
Common Questions & Troubleshooting
Every bonsai grower, beginner or expert, encounters questions along the way. Most problems stem from timing, watering, or light. Use this guide to understand what's normal, what's fixable, and when to pause and observe.
1. Why does the soil look like rocks?
Because it's supposed to. Bonsai soil isn't dirt — it's a mix of Akadama, Pumice, and Lava (A-P-L). These particles create air pockets, drain quickly, and encourage fine feeder roots. That's what keeps trees healthy in shallow pots.
If the soil looks wet for days, it's holding too much water or the pot lacks drainage.
2. How do I know if I'm watering too much or too little?
- Overwatering: Soil stays wet, interior needles turn yellow, and roots begin to rot
- Underwatering: Tips dry and crisp; foliage wilts suddenly, especially in heat
The goal is even moisture — damp, not soaked or bone dry. Stick a chopstick or your finger into the soil ½ inch. If it's dry, water thoroughly.
3. My tree looks dry, but I watered yesterday. What's wrong?
Check drainage. If water can't escape, roots suffocate even in "wet" soil. Make sure your pot has drainage holes with mesh and never sits in standing water.
Tilt the pot slightly to improve flow and loosen compacted topsoil with your chopstick.
4. Can I keep my conifer indoors by a sunny window?
No — conifers are outdoor trees. They need full-spectrum sunlight, temperature swings, and winter dormancy. Indoor air is too warm and still; even with good light, most conifers decline within months. Keep them outside year-round, protected from extreme heat and wind.
5. The needles on the inside are turning yellow or brown. Is my tree dying?
Probably not. Conifers naturally shed older interior needles each fall.
Gently remove the dead needles with tweezers or your fingers to improve airflow.
If new tips are brown, however, that signals stress from overwatering, drought, or poor light.
6. There’s white residue on the pot or soil surface. What is it?
That’s mineral or fertilizer salt buildup from hard water or frequent feeding.
Flush the soil with clean water in the morning to wash salts through, and wipe the pot rim with vinegar on a cloth.
Prevention: Use mild fertilizer and avoid letting soil dry completely before feeding.
7. My tree’s wire is cutting into the bark. What should I do?
Remove it immediately. Wire marks can scar branches permanently.
Check wired branches every 1–2 weeks during active growth (especially in summer).
If the shape holds after removal, great. If not, re-wire gently once growth slows.
8. I missed the spring repot window. Can I still repot now?
Wait. Conifers should only be repotted in early spring, just before buds open.
Repotting in summer heat or winter dormancy can weaken or kill roots.
For now, focus on watering, feeding, and keeping the tree strong until the next proper window.
9. I bought a conifer from a garden center. How do I know if it’s grafted?
Look at the lower trunk: if there’s a noticeable bulge, step, or bark texture change, it’s grafted.
That’s normal for many landscape varieties, but graft unions can limit styling choices.
Low grafts can be worked with; high or uneven grafts are better left for learning, not show trees.
10. My bonsai doesn’t look like the ones online. Am I doing something wrong?
No — bonsai is a process, not a product. The trees you see in photos took decades.
You’re learning to build health first, beauty second. Remember: A healthy, well-cared-for tree becomes beautiful in time.
Troubleshooting Summary
- Slow growth? Check sunlight and fertilizer schedule.
- Weak color? Reduce watering; increase light and airflow.
- Sudden decline? Examine roots and check for standing water.
- Unsure what to do? Pause, observe, and wait for the next seasonal phase.
Thank you for growing with Tinyroots. We're honored to be part of your journey.